Monday, 31 August 2020

Sheepski designs - A perfect time to craft

 Hello and welcome to my blog, today I would like to share with you my DT inspiration for A perfect time to craft using Penguin pals by SheepSki designs. I've been Christmas crafting recently and this was the perfect image to create such a cute project. 

Here is where you can find this months sponsor

SheepSki Designs (Andrea Norris)
Shop Link: https://www.etsy.com/au/shop/SheepSkiDesigns
Blog: https://sheepskidesigns.blogspot.com/

Please be sure to check out our blog and enter your makes to be in with a chance of winning some great prizes, including sponsor images, certificates and badges. As always the theme is anything goes. You can find the blog here: https://aperfecttimetocraft.blogspot.com/?m=1 and also our FB group here: https://www.facebook.com/groups/2080099255555175/

I would like to enter this card into the following challenges:

And here is my inspiration for this months challenge..... Please see all instructions and products used below:
  • To start with I have printed out and coloured my Image using pro markers and cut to size, then matted the image onto a silver/grey card mat.
  • I have used an 8''x8'' white scalloped base card, I have attached a piece purple watercolour paper to the base
  • The next thing I have done is taken a piece of white 7''x7'' layer I have stamped out a snow flake image randomly to the background using sticky ink, then using a clear embossing powder to heat emboss the image. I have then blended 3 different coloured inks over the image using a resist technique, I glittered around the edge creating a glittery boarder, then matted this layer on a silver/grey mat.
  • For the sentiment I have die cut the word Merry Christmas from the same colour watercolour pad as the background piece and layered onto the coordinating background die in white card stock.
  • To add some finishing touches, I have attached a piece of silver ribbon around all the matts and layers and adhered to the base. I added some glitter to the main image before securing to the card with some foam pads, then added some pearls to finish.
Products used:
  • Purple Watercolour washes paper pad from Chloe's creative cards
  • Silver/grey metallic card tock from Hobby house
  • Snowflake background stamp (free from a magazine)
  • Clear perfect medium embossing ink
  • Wow Clear embossing powder
  • Pink, Purple and Blue shimmer ink pads from Hunkydory
  • Sparklicious crystalina glitter from Chloe's creative cards
  • Main image from Penguin pals by SheepSki designs

Thank you for taking the time to visit my blog, please feel free to follow or leave a comment I will be posting frequent handmade card inspiration. 
Check out A Perfect Time To Craft Challenge Blog and enter your makes to be in with a chance of winning. https://aperfecttimetocraft.blogspot.com/?m=1 Until next time, have a great day.

Tuesday, 25 August 2020

Polkadoodles Autumn themed card

Hello and welcome to my blog, today I would like to share with you my guest design team inspiration for Polkadoodles Digi Choosday Blog. The theme for this make was Autumn, I love this season and all the colours.
We would love you to join us over on the Digi Choosday blog and enter your makes to be in with a chance of winning a $10 voucher for the store, The theme as always is anything goes.

Here is where you can find Polkadoodles:
Store website: Polkadoodles shop
Digi Choosday Blog: Digi Choosday blog
Facebook: Facebook
Instagram: Instagram
YouTube: You tube
Pinterest: Pinterest
Blog: Blog

I would like to enter this card into the following challenges:
And finally here is my inspiration, you can find all details and products used below:


  • I have started with printing off my Digi Image Nature lover and Digi papers and elements from the set Autumn/Fall Digi bundle I have created a wreath using the leaves in the bundle, I have created the wreath on Avery Print and design software, then printed out and fussy cut the rest of the elements.
  • Next I have adhered the Digi papers to the front of a 7''x7'' square white base card and added a strip of paper across the middle to hide to join.
  • I have then attached the wreath and the Digi Image to the centre of the card using wet glue. With the fussy cut elements I have added these to the wreath using small square foam pads to add some dimension.
  • Next I have taken the sentiment from the Nature lover download and used my dies to cut out a tag shape, then matted this onto coordinating Digi paper from the set and adhered using foam pads to the bottom left of the card. 
  • To finish off I have just added a little orange bow, and a few more fussy cut elements including the mushrooms and the nuts.
 
Products used:
  • Polkadoodles Nature lover Digi stamp set for the main image and sentiment
  • Polka doodles Autumn/Fall Digi bundle for the Digi papers and all other fussy cut elements and wreath

Thank you so much for visiting my blog today, If you like this card please feel free to follow or leave a comment, I will be sharing frequent handmade card inspiration. We would also love to see your creations over on our Digi Choosday blog where you can enter your makes to be in with the chance of winning fab prizes. Until next time, have a great day.

Tuesday, 11 August 2020

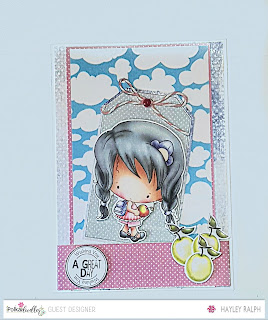
Polkadoodles back to school card


Hello and welcome to my blog, today I would like to share with you my inspiration for Polkadoodles Digi Choosday Challenge blog. The scope was to make a back to school card. I chose the Image Little miss sugar drops school and Digi papers from Winnie sugar sprinkles pack 2

Here is where you can find Polkadoodles:
Store website: Polkadoodles shop
Digi Choosday Blog: Digi Choosday blog
Facebook: Facebook
Instagram: Instagram
YouTube: You tube
Pinterest: Pinterest
Blog: Blog

Please make sure to check out the Digi Choosday Challenge Blog The theme is anything goes, so enter your makes to be in with the chance of winning a $10 download voucher.


I would like to enter this card into the following challenges:

And finally here is my inspiration, all instructions and products used are below:


  •  To start with I have printed all my images, sentiment and Digi papers on my laser brother printer, and fussy cut them all out.
  • I have used a 5x7 white card base then I have used a blue background paper and adhered to the front, next I have taken the blue sky background paper and matted onto a pink polka dot background piece.
  • I have then created a pocket for the removable tag with the same pink polka dot paper towards the bottom of the card.
  • Next I have die cut a tag shape from the grey polka dot paper and backed onto the same blue paper in the background, I have then attached my image and added a piece of pink twine and a pink rhinestone.
  • I have added the sentiment and the apples to the front of the pocket with foam pads and slotted the tag inside.
Products used:
Thank you very much for taking the time to visit today, If you like this card please feel free to follow or leave a comment I will be posting frequent handmade card inspiration. Also be sure to check out the Digi Choosday Challenge Blog and enter your makes to be in with a chance of winning. Until next time, have a great day. 

Friday, 7 August 2020

Christmas snow globe shaker card

Hello and welcome to my blog, Today I would like to share with you a Christmas snow globe shaker card I have made for my design team inspiration on the Creative fingers challenge blog. This card is fairly plain and simple and easy to make for your Christmas crafting. This month there was no sponsor so we were able to use our own stash. Please check out the creative fingers blog and enter your makes to be in with the chance on winning fabulous prizes. You can find the blog here Creative Fingers challenge blog this is a anything goes challenge and we would love to see your makes.

I would like to enter the following challenges:
Here is my inspiration, you can find all instructions and products used below:

  • To start with I have stamped out my scene image with the cute kissing Christmas bunnies and coloured using alcohol markers. Then I have attached a blue snow pattered paper piece to the front of my card base measuring 5''x7''
  • Next I have cut a circle frame using nesting dies from silver mirror card, I have then added acetate to the back of the frame and added a layer of foam tape ensuring there are no gaps in between. I have added some sequins to my coloured image and layered the frame over the top encapsulating the sequins inside.
  • Next I have used my die to cut for the snow globe base using the same mirror card and added both pieces to the card front using foam pads.
  • For the sentiment I have used a die cut merry Christmas word and shadow die, running this through my die cutting machine and layering together, I then added this to the top of my card using foam pads
  • I have tied a little bow with some Christmas ribbon and added a pearl flower to the centre of the knot.
Products used:
  • Scene snow globe creator stamp set free from a magazine
  • Silver mirror card from Hunkydory
  • Circle nesting die from Hunkydory moonstone collection
  • Snob globe die from crafter companion
  • Merry Christmas die and shadow from Sue Wilson dies
  • Snow paper from hobby house

Thank you for taking the time to visit my blog, if you like this card please feel free to follow or leave a comment, I will be posting frequent handmade card inspiration. Also be sure to check out the Creative Fingers challenge blog to be in with a chance of winning some great prizes. Until next time, have a great day. 

Saturday, 1 August 2020

Crafts U Print - A Perfect Time To Craft Blog Challenge

Hello and welcome to my blog, today I would like to share with you a card I've made using the images from Crafts U Print which was our sponsor for this months challenge. You can purchase the Floral flutters Yellow beauty mini kit here:
https://www.craftsuprint.com/card-making/mini-kits/mini-kits-birthday/floral-flutters-yellow-beauty.cfm

Please find all our sponsor details for Crafts U Print here:

Homepage: https://www.craftsuprint.com/
FB Page: https://m.facebook.com/craftsuprint-152836037285
Instagram: https://instagram.com/craftsuprint?igshid=jac1i8p7x0z4
YouTube channel: https://www.youtube.com/user/papertolekid
Twitter page: https://twitter.com/intent/follow?source=followbutton&variant=1.0&screen_name=craftsuprint
Weekly freebie page: https://www.craftsuprint.com/weekly-giveaway.cfm

Please be sure to check out our blog and enter your makes to be in with a chance of winning some great prizes, including sponsor images, certificates and badges. As always the theme is anything goes. You can find the blog here: https://aperfecttimetocraft.blogspot.com/?m=1 and also our FB group here: https://www.facebook.com/groups/2080099255555175/

And here is my inspiration for this months challenge..... Please see all instructions and products used below:


  • To start with I have created my card base and to do this I have used a white 8x8 scalloped card blank in a tent fold orientation, I have then scored and folded at the half way point on the front of the card to create an easel card.
  • Next I have printed out all the images received in the printable download, I have taken the main Image sheet topper and added this to a black mat, then a yellow 8x8 mat.
  • For the bottom of the card I have used the frame topper sheet from the same downloadable set and again added this to a black mat. I then created a white mat layer and ran around the edges of this with my glue pen and added some yellow glitter, I then added all the layers onto another 8x8 yellow mat and adhered to the base of the card
  • I still had two sheets left from my print out so I decided to fussy cut all the elements and decoupage these up using foam pads, The elements I used were the Sunflower twice and the lady in the yellow dress. I added this to the front panel of my easel card ensuring only to attach it at the bottom so the card is free to open as shown.
  • To create my sentiment to act as the stopper on my card, I cut out the sentiment with love from the Digi set, next I took a piece of black and white card and used my die cuts to layer up a frame to create a stopper, then added the sentiment on top with foam pads
  • To just add that last finishing touch to complete the card I added my clear overlay sparkle pen to the sunflower, to the Lady and to the butterfly's for that little touch of shimmer that you can see when you hold the card up to the light.

Products used:

Thank you for taking the time to visit my blog, please feel free to follow or leave a comment I will be posting frequent handmade card inspiration. 
Check out A Perfect Time To Craft Challenge Blog and enter your makes to be in with a chance of winning. https://aperfecttimetocraft.blogspot.com/?m=1 Until next time, have a great day.

Crafters Companion penny slider - looking for rainbows

 Hello and welcome to my blog, today I would like to share with you a card I have made using the Crafters Companion  Penny slider - looking ...

Thinking of you